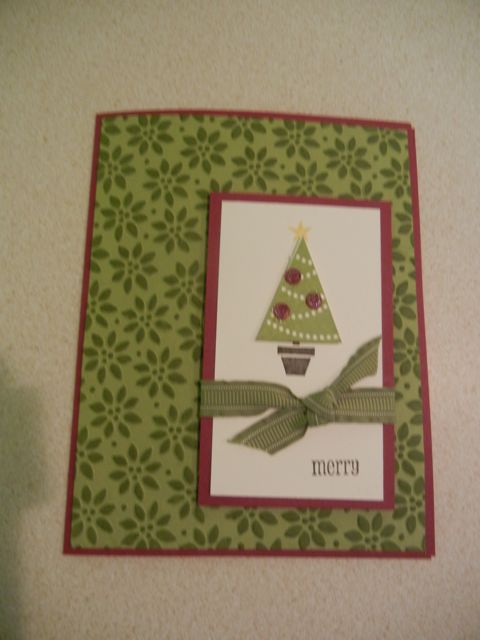
Pennant Parade Card #5 Materials 1. Pennant Parade Stamp Set 2. Petite Pennants Builder Punch 3. Lucky Limeade Classic Ink 4. Early Espresso Classic Ink 5. Perfect Polka Dots Embossing Folder 6. Big Shot 7. Lucky Limeade card stock 8 ½ “x 5 1/2” 8. Early Espresso card stock 3” x 4” 9. Cherry Cobbler card stock 2 ¾” x 1 ½” 10. Lucky Limeade card stock 3 ¼” x 2 ¼” 11. Very Vanilla 2” x 3” 12. Early Espresso ¼” grosgrain ribbon – 9” 13. Optional – Rhinestone Jewels, Paper Piercing tool Directions 1. Score Lucky Limeade card stock at 4 ¼” 2. Punch scallop pennant from Petite Pennants Builder Punch out of Cherry Cobbler scrap 3. Stamp tree base in Early Espresso ink ¾” from the bottom of Very Vanilla card stock. (Tip – use the Cherry Cobbler scalloped pennant to help you place the tree base). 4. Stamp tree (triangle) on scrap of Very Vanilla and punch out with triangle from Petite Pennants Builder Punch. 5. Adhere tree (triangle) to Cherry Cobbler scallop pennant with Dimensionals. 6. Adhere pennant piece to Very Vanilla card stock above the base of the tree. 7. Wrap Early Espresso ribbon around Very Vanilla card stock and tie in a knot. 8. Adhere Very Vanilla piece to 3 ¼” x 2/14” Lucky Limeade card stock. 9. Emboss 2 ¾” x 1 ½” Cherry Cobbler card stock with Perfect Polka Dots Embossing folder and the Big Shot. 10. Adhere embossed Cherry Cobbler card stock to bottom of Early Espresso card stock. 11. Adhere Lucky Limeade card stock to Early Espresso/Cherry Cobbler piece. 12. Adhere Early Espresso piece ½” from the top of the card 13. Stamp “Merry” ¼” below the Early Espresso card stock piece. 14. Optional Bling - Use the Paper Piercing tool to lift Rhinestone Jewels and adhere to the tree. |
Showing posts with label Pennant Parade Class. Show all posts
Sunday, September 18, 2011
Pennant Parade Card #5
Here's Card #5 from the Pennant Parade Class
Saturday, September 17, 2011
Pennant Parade Card #4

Pennant Parade Card #4
Materials
1. Pennant Parade Stamp Set
2. Lucky Limeade Classic Ink
3. Early Espresso Classic Ink
4. Daffodil Delight Classick Ink
5. Simply Scored Scoring Tool (from Holiday Mini!)
6. 1 ¼” Circle Punch
7. 3/8” Circle Punch
8. Cherry Cobbler card stock 5 1/2” x 4 1/4”
9. Very Vanilla card stock 5 1/2” x 4 1/4”
10. Very Vanilla card stock 4 5/8” x 3 1/4”
11. Lucky Limeade card stock 2 1/2” x 2”
12. Very Vanilla card stock 2 ¼” x 1 ¾”
13. 6” Lucky Limeade ruffled ribbon
14. Mini Glue Dots
15. Sticky Strip Adhesive
16. Paper Snips
Directions
1. Stamp tree base in Early Espresso ink on Very Vanilla card stock so the bottom of the tree base is 1/8” from the bottom of the card stock
2. Stamp tree (triangle) just above the tree base.
3. Stamp star in Daffodil Delight ink just above the tree.
4. Adhere Very Vanilla stamped image to 2 ½” x 2” Lucky Limeade card stock.
5. Trim top corners of 4 5/8” x 3 1/4” card stock with Paper Snips (scissors) to make a large”tag”.
6. Punch a hole at the top the “tag” with 3/8” circle punch.
7. Stamp snowflake image in Early Espresso ink randomly on 5 ½” x 4 ¼” Cherry Cobbler card stock.
8. At the top of the 5 ½” x 4 ¼” Cherry Cobbler card stock punch a half circle using the 1 ¼” Circle Punch.
9. Referring to the pattern on the following page, cut and score the 5 ½” x 4 ¼” Cherry Cobble card stock as shown. (Note the difference between dotted lines (score) and solid lines (cut).) Use the Simply Scored Scoring Tool for easiest scoring.
10. Fold the middle flap section of the Cherry Cobbler “window shade” as shown in the photo.
11. Using Sticky Strip adhere section A of the window shade to the bottom of the “tag
12. Using Sticky Strip adhere ONLY the sides and bottom of the 5 ½” x 4 ¼” of the Very Vanilla card stock to the 5 1/2 “ x 4 ¼” Cherry Cobbler card stock. The tag should move freely.
13. Using Sticky Strip adhere the bottom of the Lucky Limeade card stock to section
14. Tie Lucky Limeade ribbon through the tag and knot.
15. Slide window shade up and stamp a holiday greeting of your choice.
Thursday, September 15, 2011
Pennant Parade Card #3
Here's card #3 from the Pennant Parade Class
Pennant Parade Card #3
Materials
1. Pennant Parade Stamp Set
2. Petite Pennants Builder Punch
3. Lucky Limeade Classic Ink
4. Cherry Cobbler Classic Ink
5. Early Espresso Classic Ink
6. Perfect Polka Dots Embossing Folder
7. Big Shot
8. Jewelry Tag Punch
9. Ticket Corner Punch
10. Crumb Cake card stock 8 ½ “x 5 1/2”
11. Cherry Cobbler card stock 5 ¼” x 4”
12. Lucky Limeade card stock 5” x 3 ¾”
13. Cherry Cobbler card stock 3” x 2 ¼”
14. Very Vanilla 2 ¾” x 2”
15. 4” Linen Thread
16. Paper piercing tool
17. Rhinestone Jewels
18. Mini Glue Dots
Directions
1. Score Crumb Cake card stock at 4 ¼”
2. Adhere 5 ¼” x 4” Cherry Cobbler card stock to Crumb Cake card front
3. Emboss Lucky Limeade card stock with Perfect Polka Dots Embossing folder and the Big Shot; punch corners with Ticket Corner punch and adhere to Cherry Cobbler.
4. Punch scallop pennant from Petite Pennants Builder Punch out of Lucky Limeade scrap
5. Stamp tree base in Early Espresso ink ¾” from the bottom of Very Vanilla card stock. (Tip – use the Lucky Limeade scalloped pennant to help you place the tree base).
6. Stamp tree (triangle) on scrap of Very Vanilla and punch out with triangle from Petite Pennants Builder Punch.
7. Adhere tree (triangle) to Lucky Limeade scallop pennant with Dimensionals.
8. Adhere pennant piece to Very Vanilla card stock above the base of the tree.
9. Stamp “Merry” in Cherry Cobbler ink on Very Vanilla scrap and punch with Jewelry Punch
10. Poke a hole in the small Jewelry tag with the Paper Piercing tool. Thread Linen thread through the hole and knot at the end.
11. Adhere the tag so it “hangs” off of the tree using a Mini Glue Dots.
12. Use the Paper Piercing tool to lift Rhinestone Jewels and adhere to the tree.
Wednesday, September 14, 2011
Pennant Parade Card #2
Here's the Card #2 from the Pennant Parade Class.
Pennant Parade Card #2
Materials
1. Pennant Parade Stamp Set
2. Petite Pennants Builder Punch
3. Lucky Limeade Classic Ink
4. Early Espresso Classic Ink
5. Daffodil Delight Classic Ink
6. Petals-a-Plenty Embossing Folder
7. Big Shot
8. Cherry Cobbler card stock 8 ½ “x 5 1/2”
9. Lucky Limeade card stock 5 ¼” x 4”
10. Cherry Cobbler card stock 3 ¾” x 2 ¼”
11. Very Vanilla card stock 3 ½” x 2
12. 9 ½” Lucky Limeade ruffled ribbon
13. Crop-a-dile
14. Perfect Details Glitter Glue
Directions
1. Score Cherry Cobbler card stock at 4 ¼”
2. Emboss Lucky Limeade card stock with Petals-a-Plenty Embossing folder and the Big shot
3. Gently apply ink to the top of the embossed paper using ink pad or daubers. Adhere to the front of the Cherry Cobbler card.
4. Stamp tree base in Early Espresso ink on Very Vanilla card stock so the bottom of the tree base is 1 ¼” from the bottom of the card stock
5. Stamp tree (triangle) on scrap of Very Vanilla and punch out with triangle from Petite Pennants Builder Punch.
6. Using Dimensionals adhere tree (triangle) just above the tree base.
7. Stamp star in Daffodil Delight ink just above the tree.
8. Stamp “Merry” in Early Espresso ink ¼” from the bottom of the Very Vanilla card stock
9. Adhere Very Vanilla piece to 3 ¾” x 2 ¼” Cherry Cobbler card stock
10. Wrap Lucky Limeade ruffled ribbon around Very Vanilla/Cherry Cobber card stock and tie in a knot.
11. Using Dimensionals adhere Very Vanilla/Cherry Cobbler piece to embossed Lucky Limeade card stock 1/2” from the bottom of Lucky Limeade card stock
12. Punch small Cherry Cobbler circles from scraps using Crop-a-dile; Adhere to the tree. Cover with Perfect Details Glitter Glue.
Subscribe to:
Posts (Atom)